29 October 2019
So this is it, my first blog post. :D I thought I would begin with an interesting 1-day exploit development challenge. In the recent Hack.lu, a challenge named Contiki-NG was released. It had 0 solves and I only saw it after the CTF.
![]() Contiki-NG
Contiki-NG
“Contiki-NG is an open-source, cross-platform operating system for Next-Generation IoT devices. It focuses on dependable (secure and reliable) low-power communication and standard protocols, such as IPv6/6LoWPAN, 6TiSCH, RPL, and CoAP.”
In the challenge, we were given a 32-bit ELF binary that was the a “border router” of version 4.2. Alongside it was a script that would run each time we connect to the challenge service on port 1337.
 The scripts and ports
The binary will connect to our IP on port 60001 and exploitation begins from there.
From the competition description, the bug was undisclosed via the CVE system and was only fixed in the most recent version 4.4. With this information, we can use the Github comparison tool to sieve through all commits made between the second latest version, 4.3, and 4.4.
I was able to pinpoint the likely bugfix to this commit, due to the addition of length and boundary checks, a sign of fixing some form of out-of-bound access bug. Of course, the title of the commit only served to confirm my beliefs. However, I did stumble quite a bit when attempting to exploit the program, as the commit actually contained several bugfixes, and while all bugs can be exploited, only one could easily achieve code execution.
 The vulnerability
This is the vulnerability I chose to exploit, due to its simplicity. Essentially, when the siclowpan network stack reassembles network fragments packets in a memory buffer of size 0x500, there were no bound checks on the index of the packet fragment. As the index is 1 byte, it can go up to 255, causing out-of-bound write up to 255 * 8 = 0x7f8 from the base of the buffer.
Admittedly, the hardest part of the challenge was getting up to speed with the many protocols that the program used, as they were all extremely foreign to me. When we initially host a netcat listener on port 60001, we can see that the server repeatedly sends 3 bytes.
 Weird bytes
After some digging, we understand that the 3 bytes are actually a request for MAC address from the client, us. It is part of a command system of Contiki-NG. If network packets began with ‘!’ or ‘?’ followed by a letter, the router interprets them as commands. Otherwise, the packet is forwarded to the tun interface as a data packet unless it is a completely printable string.
 The request code…
 …and the setting code
It is also important to note that the router uses the SLIP protocol to communicate with us. It is an extremely simple protocol whereby data packets have to end with ‘\xc0’, and occurrences of ‘\xc0’ in the packet are escaped.
We reply a MAC address with our server and it indeed shows up in the router logs.
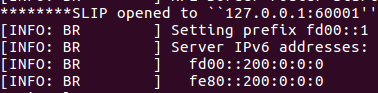 The MAC has been set
Now what? While I did try quite a few approaches, I will focus on the successful method here. The data packets are handled by the function aptly named input as part of siclowpan network stack. We first register that we have fragments incoming by sending a special fragment known as first fragment.
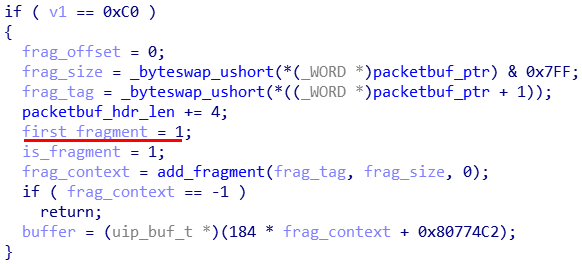 Code for first fragment
The frag_info array will subsequently be populated.
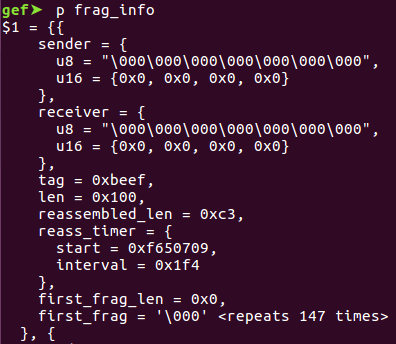 frag_info
We can send subsequent fragments are use the same tag 0xbeef to match them up. Once the fragments have a total size of above or equal to the total size given, the reassembly happens and the OOB happens. One small note here is that the last fragment cannot contain an OOB index due to some minimal size checks. We can of course easily put our evil index in any other fragment after the first.
 Initial success
It worked! The 32 bytes of ‘\x41’ had been written 0x2f8 bytes from the end of uip_aligned_buf, the buffer to store assembled fragments, on the BSS. Now the next question to tackle: how do we transform this into code execution?
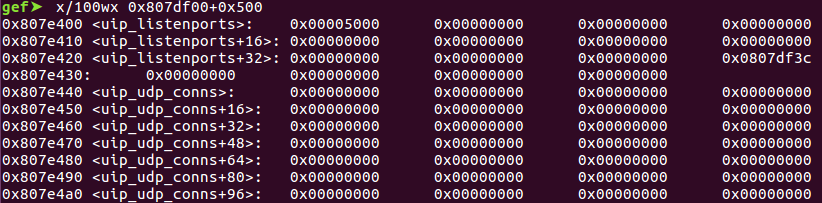 What comes after the buffer
At first glance, the outcome almost seem unexploitable. The area following our buffer appear to be another buffer, and some information tracking UDP connections. The struct uip_udp_conn, used by uip_udp_conns, is fairly mundane, with information tracking ports and IP addresses. After enumerating through all member structs as well as some UDP handling functions, we come across something very interesting.
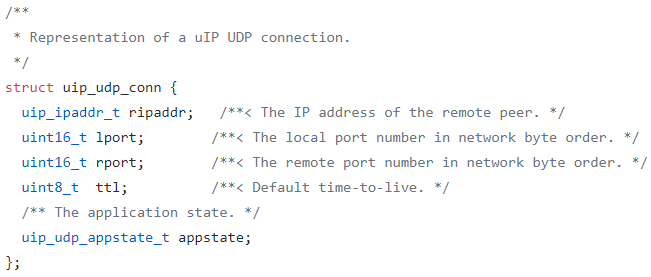 Structure of uip_udp_conn
When an UDP packet was received, if there is a valid UDP connection open, the function tcpip_uipcall is called.
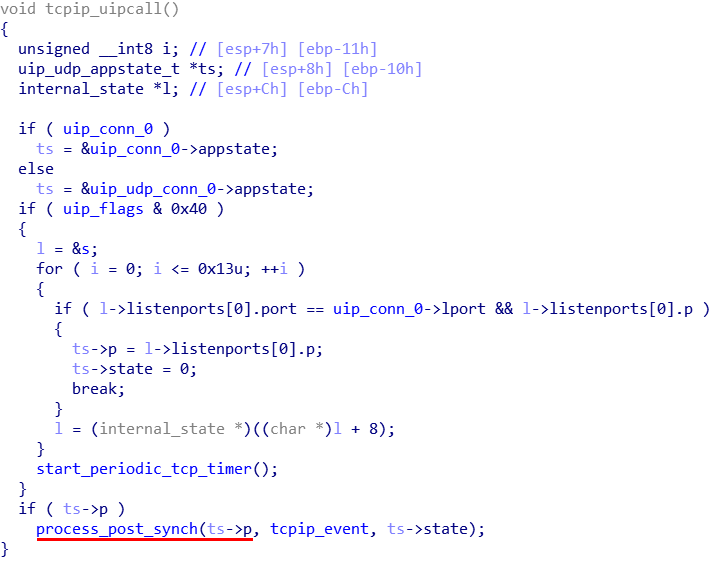 The call
If a UDP connection struct’s appstate is not empty, a synchronisation function process_post_synch is called. It then calls in turn calls call_process.
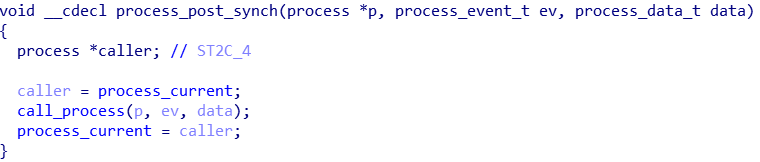 More calls…
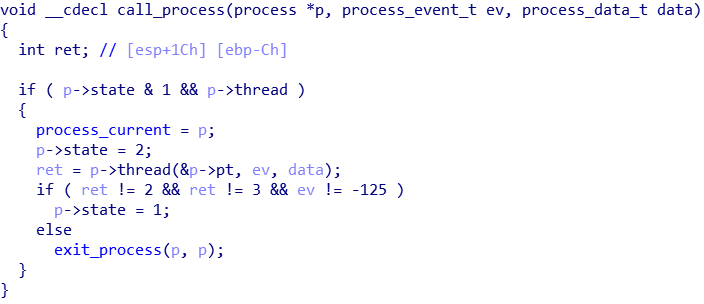 call_process
From a decompilation perspective, it is very obvious what the call_process function call_process is doing. If the struct’s state is correct and has a function pointer in member “thread”, it will execute the function pointer. In other words, if we fake a UDP connection struct with an appstate member that points to a process struct that we control, we get to call any function we want. The task was made easier as the data were all on the BSS, which had a non-ASLR address given that PIE is not turned on. In my exploit, I made 8 fragments of 0x20 each in case of the need for a long ROP. In one of them, the data was a fake process struct.
Writing and debugging an UDP packet to trigger the call was pretty time-consuming, but nonetheless pretty manageable.
 #pwned
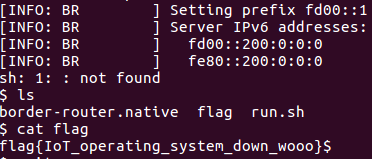
It worked! While I did initially mull over the a suitable address to call to perhaps stack pivot to a ROP chain, I realised that the easiest route was to simply call system which was present as GOT address in the binary. We can control the arguments to our function as well, so system(“/bin/sh”) wasn’t a problem.
Exploit can be found here, and the slip module used is here. This blog post was meant to condense my analysis and development of an exploit and glossed over a lot of details as well as my own mistakes. As seen below, exploit development can get pretty messy at times…
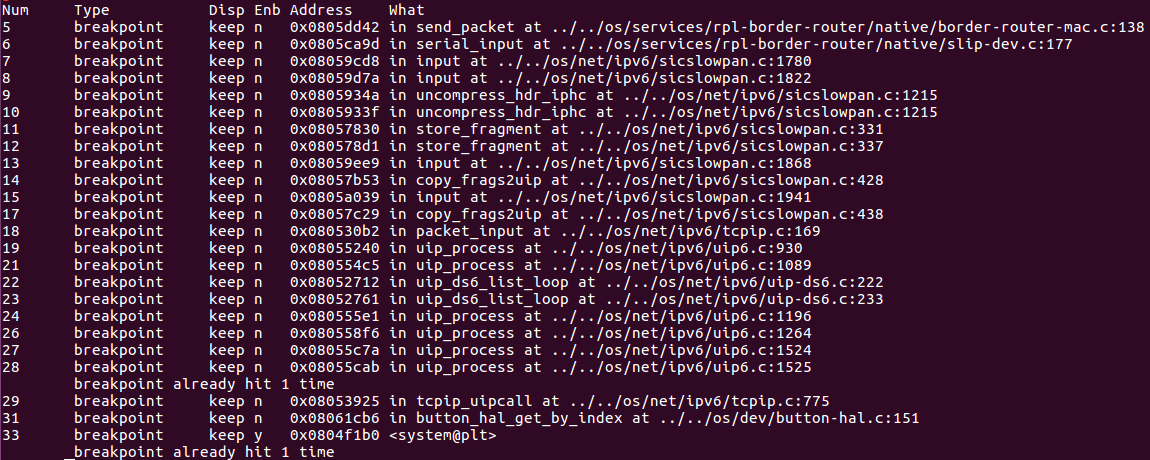 So many breakpoints
The concept of the exploit wasn’t hard; it was not too different from writing outside of array due to a unchecked index, something that beginners to pwn would have done. What makes it difficult was the steep learning curve you had to surmount before being able to reach the exploitable code path. It’s a pity that the challenge had 0 solves in the CTF (not to say I could do so either).