07 November 2022
Recently, I took part in an on-site CTF, LakeCTF, organised by the polygl0ts and hosted in EPFL located in Switzerland. A big shout out to my team, cheriPI (Cambridge University), for being so wonderful. The following is a documentation of a rather interesting pwn challenge from the CTF named paccheri.
 It’s me!
 Fig 1. Dockerfile
Looking at the Docker configuration given by the organisers, we see that it is a 64-bit ARM challenge and that we will be running the binary out of the QEMU system emulator for local testing.
Thankfully, IDA Pro supports 64-bit ARM decompilation, which provides me with a fairly decent understanding of the given binary right off the bat. However, it does not recognise PAC instructions, which is crucial for the intended solution of this challenge.
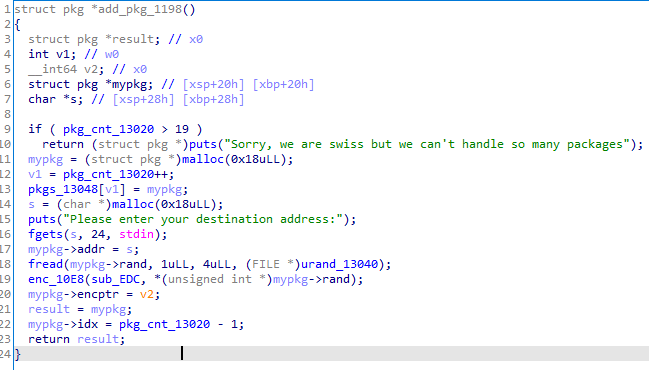 Fig 2. Function for adding a package
To sum up, the binary allows us to create package (think post office) objects. We can set a destination for a package, change it afterwards, free the object by declaring it lost, or check the package, which calls the object’s checking callback. The structure of the package can be easily seen with the package creation function and it is as follows:
struct pkg
{
  char *addr;
  int idx;
  char rand[4];
  void *encptr;
};
The first two fields are fairly straightforward; there is a string pointer to the package’s destination (24 bytes long), as well as its index. What’s curious are the next two fields.
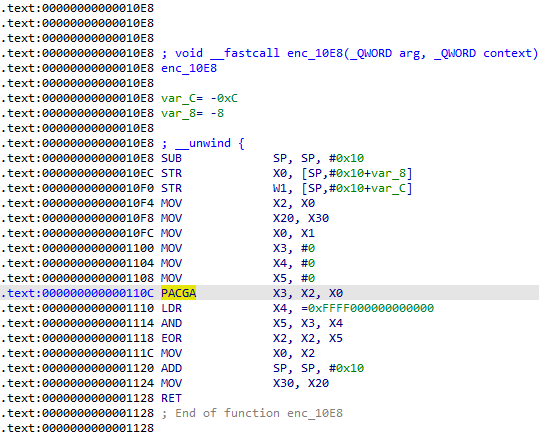 Fig 3. Assembly for encrypting pointer
Here, we see that the PACGA instruction is used to produce a pointer using the first and second parameters. We can assume that this instruction is a black box that will produce the same output given the same two values. The third field of the structure is a 4-byte unpredictable random seed used in encrypting the callback pointer for the package and the final field is the encrypted pointer itself. Next, we will see that the author does not use PAC as one would expect, but instead takes a very convoluted approach.
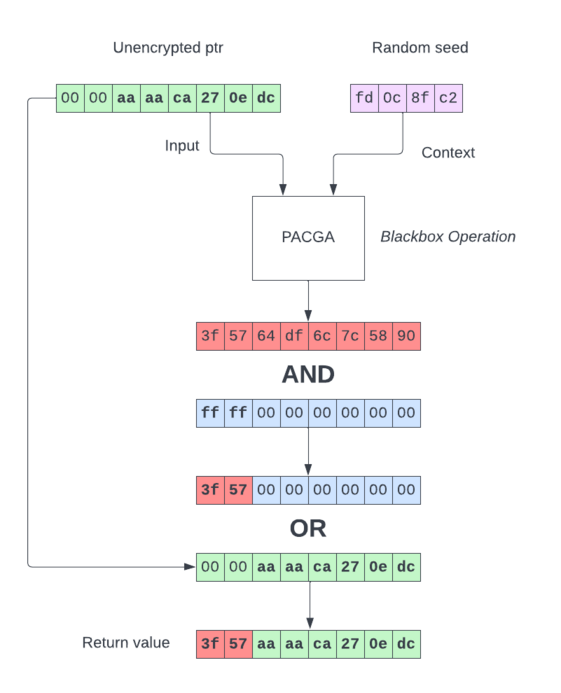 Fig 4. Pointer encryption process
As we know, current CPUs use only 48-bits of 64-bit addresses, with the upper bits sign-extended. Making use of this fact, what the code does next is to extract the upper two bytes of the encrypted pointer with a bit-mask and combine it with the unencrypted pointer, which honestly feels very artificial and CTF-like. Nonetheless, we will have to keep this process in mind as it will show up later.
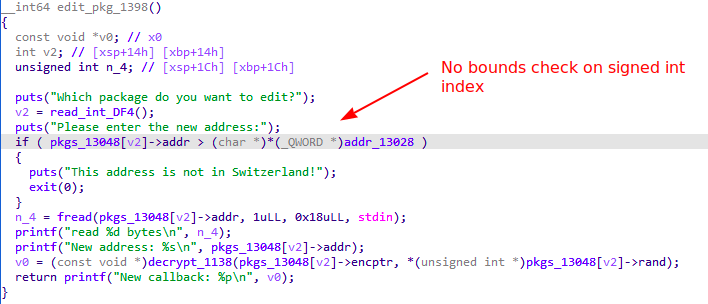 Fig 5. Package edit function
Given a general understanding of how the program works, we can now look for bugs. While there are some minor issues, the main exploitable bug lies in the package editing function, which allows us to edit the value of the string pointer for a given package. It does not do bounds checking on the package index provided of type signed int, allowing us to use negative indices.
 Fig 6. 12FF0 pointing to 13048
By scanning backwards from the start of the array of packages, we see a pointer to the array. It is at index (0x12ff0 - 0x13048) / 8 = -11.
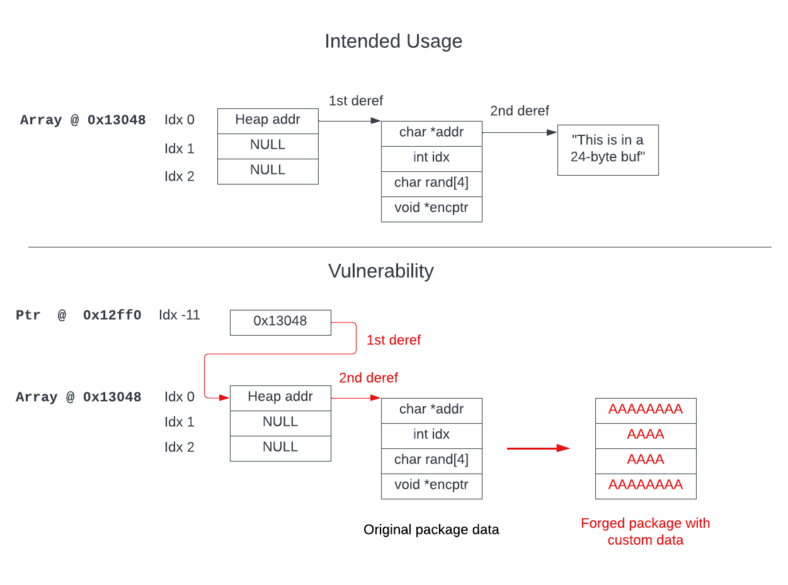 Fig 7. How the vulnerability works
Using a negative index that points back to the array may seem harmless at first glance, but it in fact makes a huge difference. Now, the first package in the package array is used instead as the string pointer used to hold the destination. This means that we can forge an arbitrary package by writing a string to it.
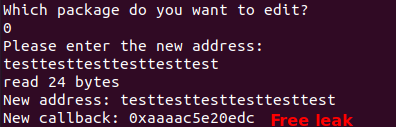 Fig 8. Free leak to defeat PIE
By forging a package with an arbitrary address for its destination pointer, we can obtain arbitrary read. Since the edit function conveniently gives us a PIE address of the current callback function, we can obtain PIE base and use the arbitrary read to leak a LIBC address using the GOT. Next, we can invoke DynELF, which essentially carries out the function of readelf by parsing the memory of the remote LIBC through an arbitrary read primitive. With it, we do not need any information on the remote LIBC and just simply resolve the location of system().
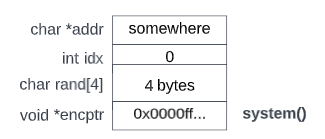 Fig 9. Initial forged package
Next, I forged a new package this time with the address of system() as its encrypted pointer, without the aforementioned upper two bytes. In yet another artificial element of the challenge, the function for displaying packages calls a function that calculates an “error state”.
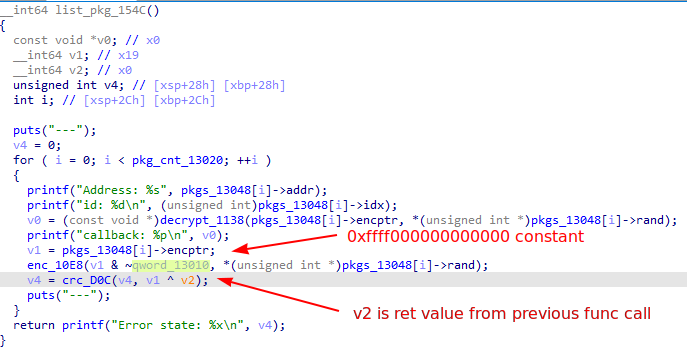 Fig 10. Call to CRC function for each listed package
For each package being listed, list_package uses the process in Figure 4 to derive the top bytes and put them through the CRC function. This means that the CRC output will be the same for an encrypted pointer as well as our pointer with top bytes 0.
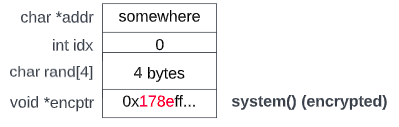 Fig 11. Forged package with upper two bytes
Since there are only two bytes involved in the CRC function, we can trivially brute force it. I copied the IDA decompilation directly and made some minor touch-ups to create a brute-forcing tool. Now, we can forge the package again, but this time with the encrypted upper two bytes for the system() pointer.
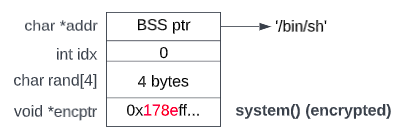 Fig 12. Our forged package for RCE
Now, with callback being system(), all we need is the destination pointer to point to '/bin/sh'. Since we don’t have a heap leak, I chose to make the destination pointer point to a random BSS location and edited the package normally and wrote '/bin/sh' at that BSS memory location.
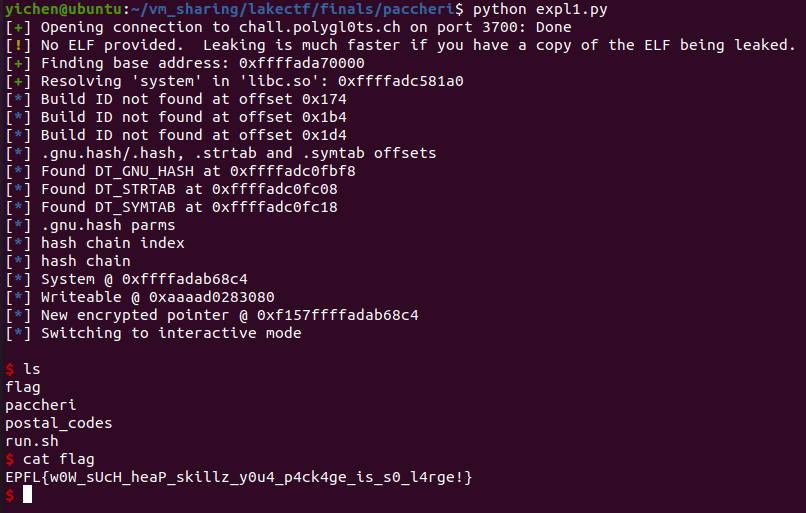 Fig 13. Flag got
By executing the package checking function, system('/bin/sh') is called, dropping us to a shell. The flag is EPFL{w0W_sUcH_heaP_skillz_y0u4_p4ck4ge_is_s0_l4rge!}.
In my opinion, this challenge is easier than it looks. The use of QEMU, ARM and the fairly intimidating PAC instruction set (think iOS exploits) may throw some off to the fact that it is a rather simple pwn that involves negative indexing and faking structures. This is my first time playing with cheriPI, so it’s a relief that I managed to solve any pwn challenge at all. Exploit linked here.